


In honor of the spooky season that is upon us, I took an afternoon to craft some delightfully scary Halloween decorations. After acquiring all the necessary supplies for both projects during a quick trip to Walmart, I sat down to put my creative skills to the test. One hour and a little less than $25 later, I had two downright adorable seasonal decorations to spice up my home for October.
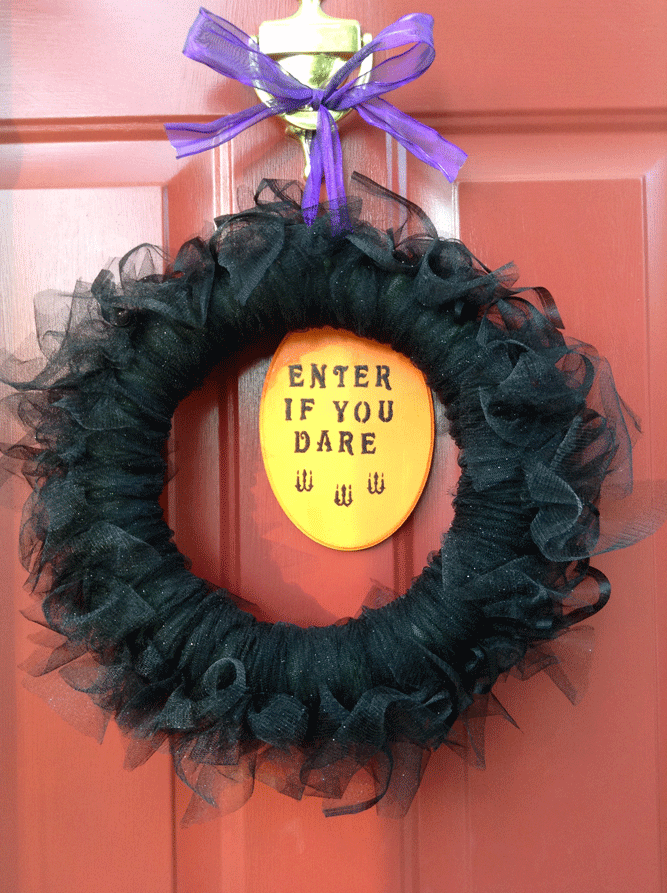
Halloween Tulle Wreath and Plaque
Inspiration: littlebirdiesecrets.blogspot.com
Total cost: $15.91
Assembly time: 45 minutes
Materials:
Foam wreath ($3.97)
Three yards black sparkly tulle ($1.49)
Oval wood plaque ($0.97)
Adhesive letter stencils ($2.77)
“Sequin black” acrylic paint ($1.77)
“Pumpkin orange” acrylic paint ($0.97)
Roll of thick purple ribbon ($4.97)
Foam brush
Scissors
Directions
Step 1: Using a wide foam brush, cover the wood plaque in two coats of orange acrylic paint and hang to dry while you make your wreath. *Important: Be sure to leave on the plastic hanger that comes attached to the wooden plaque. You will use this later when tying the plaque to the wreath.
Step 2: Cut the tulle into strips anywhere from two to four inches wide and six to ten inches long.
Step 3: Tie each strip of tulle around the foam wreath with the edges sticking out around the outside of the wreath. In order to give your wreath a fuller look, push together the tied strips of tulle so that they bunch together and the wreath underneath is not visible. Continue tying strips of tulle around your wreath and bunching them together until the entire circumference has been covered.
Step 4: Check to make sure the painted plaque is fully dry. Stick on your adhesive letters to make whatever scary message or phrase you want to have painted on the plaque, as well as whatever decorative stencils you would like to use. I chose the phrase “enter if you dare,” along with three spooky chandelier designs.
Step 5: Paint over your letter and design stencils with black acrylic paint, and peel the stencils off when you are finished. Hang the plaque back up and wait for it to finish drying.
Step 6: Cut a long piece of thick purple ribbon and thread it through both the plastic hanger on the plaque and one of the pieces of tulle tied to the wreath.
Step 7: Hang your wreath and plaque by tying the purple ribbon around the handle of the knocker on your front door. You’re done!
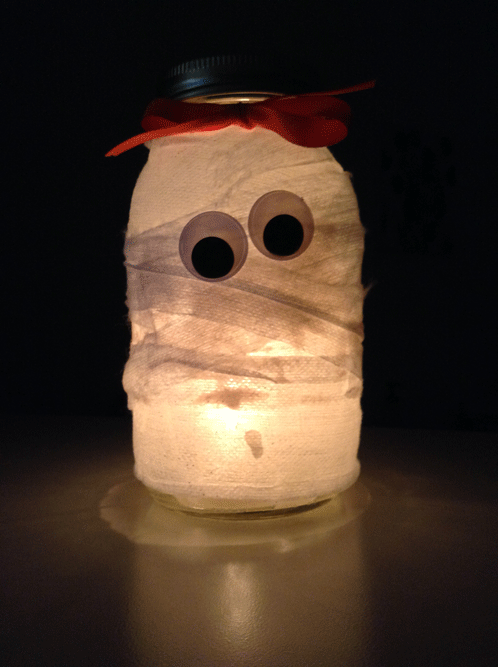
Mummified Candle Jar
Inspiration: mojosavings.com
Total cost: $8.27
Assembly time: 15 minutes
Materials:
Single quart glass jar ($1.87)
Thin orange ribbon ($1)
Gauze pads ($2.44)
Wiggly eyes ($0.97)
Unscented tealight candles ($1.99)
Mod Podge, or other crafting glue
Foam brush
Scissors
Directions
Step 1: Cut or tear the gauze pads into long strips one to two inches thick.
Step 2: Using a thick foam brush, coat the glass jar in a thin layer of mod podge or crafting glue.
Step 3: Wrap the gauze strips around the glass jar, until it is completely covered. You may wrap the jar in as many layers of gauze as you please, keeping in mind the candle will shine through either fairly bright or rather subtly, depending on how much gauze you use.
Step 4: Cover the wrapped jar in another layer of crafting glue in order to seal any loose ends of the gauze strips.
Step 5: Tie a piece of thin orange ribbon in a bow around the top of the glass jar, just below the opening.
Step 6: Using more crafting glue, press on two wiggly eyes, in order to give your mummy jar a face.
Step 7: Light one tealight candle, lower it into the jar, and enjoy the soft and spooky glow of your finished mummified candle holder.
Categories:
Halloween DIY crafts for decoration, inspiration
October 31, 2013
More to Discover
Nicole Schroeder • Nov 6, 2013 at 9:40 pm
These are adorable! I love the wreath, and I’m sure it’d be a great craft to mix up and use for other holidays as well. I can’t wait to try it!
Grace V • Nov 6, 2013 at 7:29 pm
That’s such a cute way to celebrate Halloween, I think it would be a fun thing for the kids to try to do!