
Why Homebrew?
Homebrew is a back-door into your Wii to install applications Nintendo won’t allow. This allows for an even more diverse Wii experience, such as being able to backup and load Wii games from a USB drive. With Homebrew, Wiis can become a home media device, play many unique Indie games and much more.
All of these instructions are step by step and simple to follow; however, you must still use them at your own risk. Now, it is time for the fun part.
Set-up Overview
- Load and Place Files (grab the key to the back door).
- Activate Letter Bomb (put the key into the back door; don’t worry it is not a real bomb).
- Install HBC (open the back door).
- Install BootMii (prop the back door open with a door stop OR make a safety net).
- Install Preloader (prop the the back door open with a chair OR put up your safety net).
- Back-up Memory (take a picture of what’s inside).
- APPS, APPS, and more APPS (load in the goods).
- Learn More
- Enjoy!
Quick Starting Checks
- Be ready to write down some information to be used later on.
- From the Wii Channel Menu, use your Wiimote to select the Wii Settings icon in the lower lefthand corner.
- Quickly, check the upper righthand corner, and make sure that it says “4.3U”. If it does not, update your system.
- Select the bar labeled “Internet” from page 2. Then select “Console Settings.”
- Take note of the MAC Address on the first line. Then back out to the Channel Menu
Place Files
- Insert your SD card into your computer. (I suggest using at least a 1GB SD card).
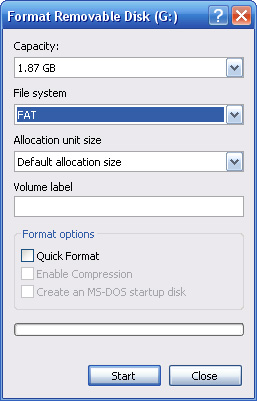
- Format your SD card to the FAT filesystem (or just erase all the files if your card is already FAT formatted). Keep in mind all the data will be erased off the SD card.
- Open My Computer
- Right-click on the drive that contains the SD card and select “Format …”
- Under “File system” make sure you select FAT (see picture)
- Click “Start,” and let the process Finish
- You did it and are ready to continue.
- Download Homebrew.zip
- Un-zip Homebrew.zip, and place the contents of the Homebrew folder on to the root of your SD card (that should be empty).
- Go to please.hackmii.com and enter you Wii’s MAC Address that you should have gotten earlier.
- Download the file by entering the Recaptcha, and click “Cut the red wire”.
- Un-zip the downloaded file, and place the contents into the root of your SD card.
- Eject your SD, and insert it into your Wii in the front panel.
- Turn on your Wii as we are now going to continue there.
Activate Letter Bomb

- Go to the Wii Messageboard in the lower righthand corner.
- Look for the special message in “Today,” “Yesterday,” or “Two days ago.”
- Click on the letter, and be patient. It could take up to a minute to load.
Install HBC (Homebrew Channel)
- For a little while, there will be only text menus. It’s going to be OK. Just follow along closely.
- When prompted press 1 on the Wiimote (you have been using).
- Use the D-pad (or arrow keys) to move up and down, and use the A button to select.
- Note what it says after “BootMii:” (can be installed OR can only be installed as an IOS)
- Select “Continue”
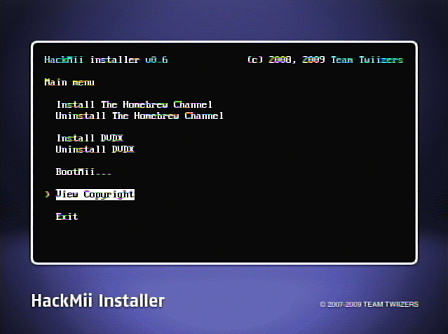
- Select “Install The Homebrew Channel,” then select “Yes, continue”
- If it says “SUCCESS” then select “Continue.” If it doesn’t, repeat steps 5 and 6.
- You did it you now have the basics of Homebrew install on your Wii.
- Select “BootMii…”
- Select “Install BootMii as” (“IOS” OR “Boot2”)
- Select “Yes, continue”
- Again Select “Yes, continue”
- If it says “SUCCESS” then select “Continue.” If it doesn’t, repeat steps 2 to 4.
- Select “Return to the main menu”
- If you installed it as Boot2, your safety net is setup. Either way you’re ready for the Section.
Install Preloader
- Yea, back the nice image menus.
- Using the normal way of pointing; select the right arrow twice (OR press the + on the Wiimote twice).
- Select the box the says “/apps/preloader/boot.dol”
- Select the middle box that says “Load”
- Press the + button on the Wiimote.
- After waiting a few moments, you are ready for the next section.
(At this point should be starting to understand how to navigate in the homebrew channel. Now, onto how to navigate around BootMii.)
Back-up Memory
- To get into BootMii, press the house button on the Wiimote when in homebrew.
- Select BootMii
- You can’t use your Wiimote with BootMii. To move the cursor press the power button (on your Wii console), and to select an option press the reset button.
- Now select system. The gears are the symbol for the system. (Press the power button three times, then the reset button once.) See Picture to the left.
- The first option is to back-up all your Wii’s files to your SD card. Press the reset button once.
- Wait a few moments as all the back-up processes run.
- When the back-up has finished (with most of the little boxes green), you can rest peacefully knowing that your Wii is safe from harm’s way.
Apps, Apps, and More Apps (Optional)
- So far it has been all about the installation of Homebrew. Now onto the whole reason for all this work.
- In this package, I’ve loaded on a few fun and useful apps. Here are some quick overviews of my favorites.
Wad Manager / Wad Installer Channel (Optional)
- This app allows you to install channels just like the News or Weather channel. I’ve included a few .wad files. Each version has a wad installer channel and the USB Loader GX. This is only possible because of a bug on the Wii, but not all Wiis have this bug. So, we will add it just to be safe.
- Goto your Homebrew Channel, choose the app Trucha Bug Restorer, and load it.
This is just the Beginning
Now that your Wii is unlocked, your Wii is open to a world of possibles. Explore, google, and learn more about what you can do with Homebrew!
Photos from wiibrew.org used with permission under the Fair Use Doctrine.
By John Gillis




























Avantika Khatri • Mar 4, 2012 at 3:38 pm
This is very cool. I know very little about technology, so I look forward to reading more tips!